After a hard day at work, we followed Q back to his workshop. His workshop is his "little" area to tinker with things, next to his house. It's hardly little, tho - it's nearly the size of GV Central. Instead of game systems and computers, however, Q's workshop contains pretty much anything you could need to work with wood, with a table saw, a jigsaw, a lathe and a custom-built computer controlled cnc machine. I had a goooood feeling about this.
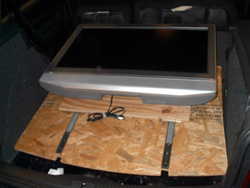 We set right to work. Q searched around his shop and sourced some door hinges to mount the TV board to the baseboard, but it was going to require some changes to our planned design. The TV wasn't lifting high enough to clear the bottom of the hatch opening, so that wasn't going to work. After looking around a bit more, Q pulled out a pair of slide hinges that were sourced from some old office furniture. These would do the trick. With careful placement of these hinges, we could mount the TV board to the base board, and be able to set the TV flat for transport and swivel it forward and then push it back to rest against the back of the rear seats when in use. Not only that, but we could even do the conversion without temporarily moving the rear seats forward. Excellent. The only remaining issue was to figure out how to keep the base of the TV from sliding back and allowing the TV to fall flat, which would not be good. After a bit of discussion, Q pointed out that we could make some dowel pins that set into the baseboard and stuck up into the air a bit, preventing the TV board from sliding. After about a minute with his lathe, we had our first pin in hand. Another minute and I had a hole in the baseboard for the pin to slip into, and we could see that the method was a good one. After some brief discussion, we decided on three pins total. However, after all three pins were made and the second one was installed, it seemed more than sturdy enough, so the third pin became a spare.
Now we had a new design consideration to tackle. Specifically, we hadn't planned on the slide hinges. Even though they made this install much easier and more functional than it would have been without them, we now had two slide hinges that would be visible when the TV was in use, and I was pretty sure that carpeting the slide hinges might be a bad idea. It also would be nice to hide the locking pins. They were great at what they did, but weren't intended to be pretty.
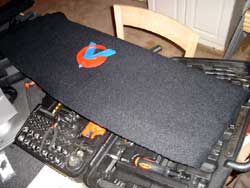 That's when I suggested that all we needed to address both of these issues was a removable piece of plywood that would serve as a cover, hiding the pins and the slide hinges. We could carpet this cover and whatever else needed to be carpeted to help finish the appearance of the system. Well, a quick pencil line, a few measurements and about thirty seconds worth of jigsawing later, and we had our cover. A quick test fit showed that we had the mechanical aspects of the install complete. Yay for us. Now it was time to address the need for power.
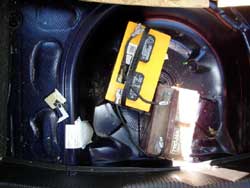 J.R. Nip had brought some raw materials that we could use for the install, courtesy of his parents. Specifically, we had a marine battery and a battery charger. That would be a start. However, Q happened to have a golf cart with something like six or eight batteries in it. We had arrived at the conclusion that the best place to put the batteries was in the spare tire's wheel well, which would be directly beneath the TV. This imposed a height restriction and, unfortunately, the golf cart batteries were too tall to fit. We did, however, borrow a 1500 watt inverter from Q, which should be able to handle our needs, should we be able to get enough batteries to run the system. The initial battery install that we tried out that night was a single marine battery, the battery charger and the 1500 watt inverter. It showed indications that it could work, but we didn't have the PS3 with us at Q's shop and the battery was not charged much, so truthfully, this was still conjecture. Still, the mechanical part was workable and worked out nicely, so we had made a good bit of progress, and we returned to GV Central, happy with our night's progress.
Wednesday:
Today would prove to be the day that I lost some good help; J.R. Nip left work at about 2:30 PM to claim his place in line for a PS3 at a Walmart in Denham Sprangs, LA. (Actually, it's spelled "Springs", but apparently is pronounced "Sprangs" by the locals.)
I didn't get too much done on Wednesday night, but I did manage to get the GV logo attached to the cover board and cut the carpet to fit it as well.
Thursday:
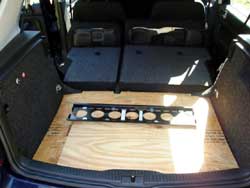 This was the big day; the day when I had to stop measuring my remaining time in days and start measuring my time in hours. As I drove in to my day job, it occurred to me that I should ask my stepfather for the use of some batteries. He has a farm/cattle ranch, and that means lots of farming vehicles and accessories that need batteries. He came through for me, bringing down a tractor battery and a marine battery Thursday evening. Thursday evening was quite busy for me. I relocated the inverter to the backseat, placed the two new batteries into the wheel well, had to cut a piece of plywood to fit over the batteries so that they wouldn't accidentally short out on the screws of the slide hinges, install the PS3 and test the system out. It wasn't until I tested this setup that I actually got a chance to play on my PS3, and that was a single race of Riiidddge Racer! It was beautiful, but I didn't have time to spare. I swapped the power over to the batteries and made sure that the system would actually fire up, then turned everything back off.
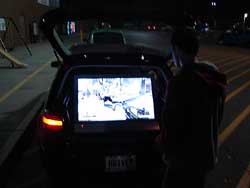 I then decided that I would actually drive the system around with the screen up, rather than putting it up and down at the different locations. This served several purposes. First of all, it made things go faster, in general. Second, it allowed me to store the power inverter and the PS3 between the back seat and the TV, in a triangular area that was created by these two and the floor. Finally, when discussing our plans with some co-workers, someone had said it was not good for LCD TVs to be transported while laying flat, so I thought maybe it would be best to drive with it upright.
For safety, we kept the spare tire in the car, placing it in the back seat and securing it with a seat belt. We also had room to carry a couple of fold-out camping chairs that we had purchased for this sort of thing. It looked like our main event would be ready. Time to prep the support vehicle.
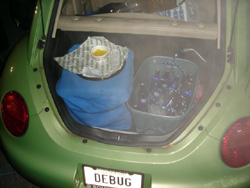 The "support vehicle" was going to be "Debbie" (AKA DEBUG), my 2005 Cybergreen VW New Beetle. We were using it to carry J.R. Nip and Psibabe to the locations, as there was not much room in the Golf, and also using the trunk to serve refreshments. I took a large blue rectangular storage bucket, a blue rope light, some ice and some imagination and created a nice looking, glowing ice chest for showing off our BAWLS to the masses. Next to that, I continued the blue theme, taking a clue "cube" seat/footrest/thingamabob from IKEA (borrowed from GV Central's entertainment room) and pressing it into service as a table to hold our party trays. The reason I selected this (other than the color) was that it is hollow on the underside, and, as luck would have it, has room to store the small Quizno's party trays. This way, I was able to have one out for access at one location and could, if I wanted to, leave a second tray hidden until I went to the next location. This setup worked very well, although we ran through the sandwiches rather quickly and ended up cracking the second platter at the same location as the first. Even so, the setup worked well and I think we could store up to five sandwich trays in this manner.